To convert floor plan to 3D, start with a clear plan image, supply known dimensions, and recreate its walls, doors, and windows in an editable floor plan. Check the 2D layout against the reference, then open its 3D view to inspect the rooms and furniture. In floorplan.chat, you can upload a reference image, confirm the proposed layout, and keep editing the same plan by chat or by hand.
How to convert floor plan to 3D from an image
The useful result is a layout you can inspect and change. Before you begin, decide whether you need an editable model or simply a finished picture. For example, Rendair describes separate tools for an editable 3D model and a styled floor plan image (checked November 2026). Choose according to what you need to do next.
For a reference-image workflow in floorplan.chat, follow these five steps.
1. Prepare the reference and its dimensions
Use a top-down plan with the complete outside boundary visible. Keep wall lines, door openings, windows, and useful room labels readable. Trim unrelated page borders without cutting away dimension labels. If you are photographing a paper plan, hold the camera square to the sheet and avoid shadows across the drawing.
Write down at least one known horizontal distance and one vertical distance. Identify which walls or corners each measurement joins. Add room dimensions when you have them. SketchUp's guidance also starts model preparation with checking sizes and correcting scale.
For this walkthrough, the reference drawing has an outside width of 8.2 m and depth of 6.2 m. The entrance is at the bottom. The living and kitchen space occupies the left side, with a bedroom above a bathroom on the right.
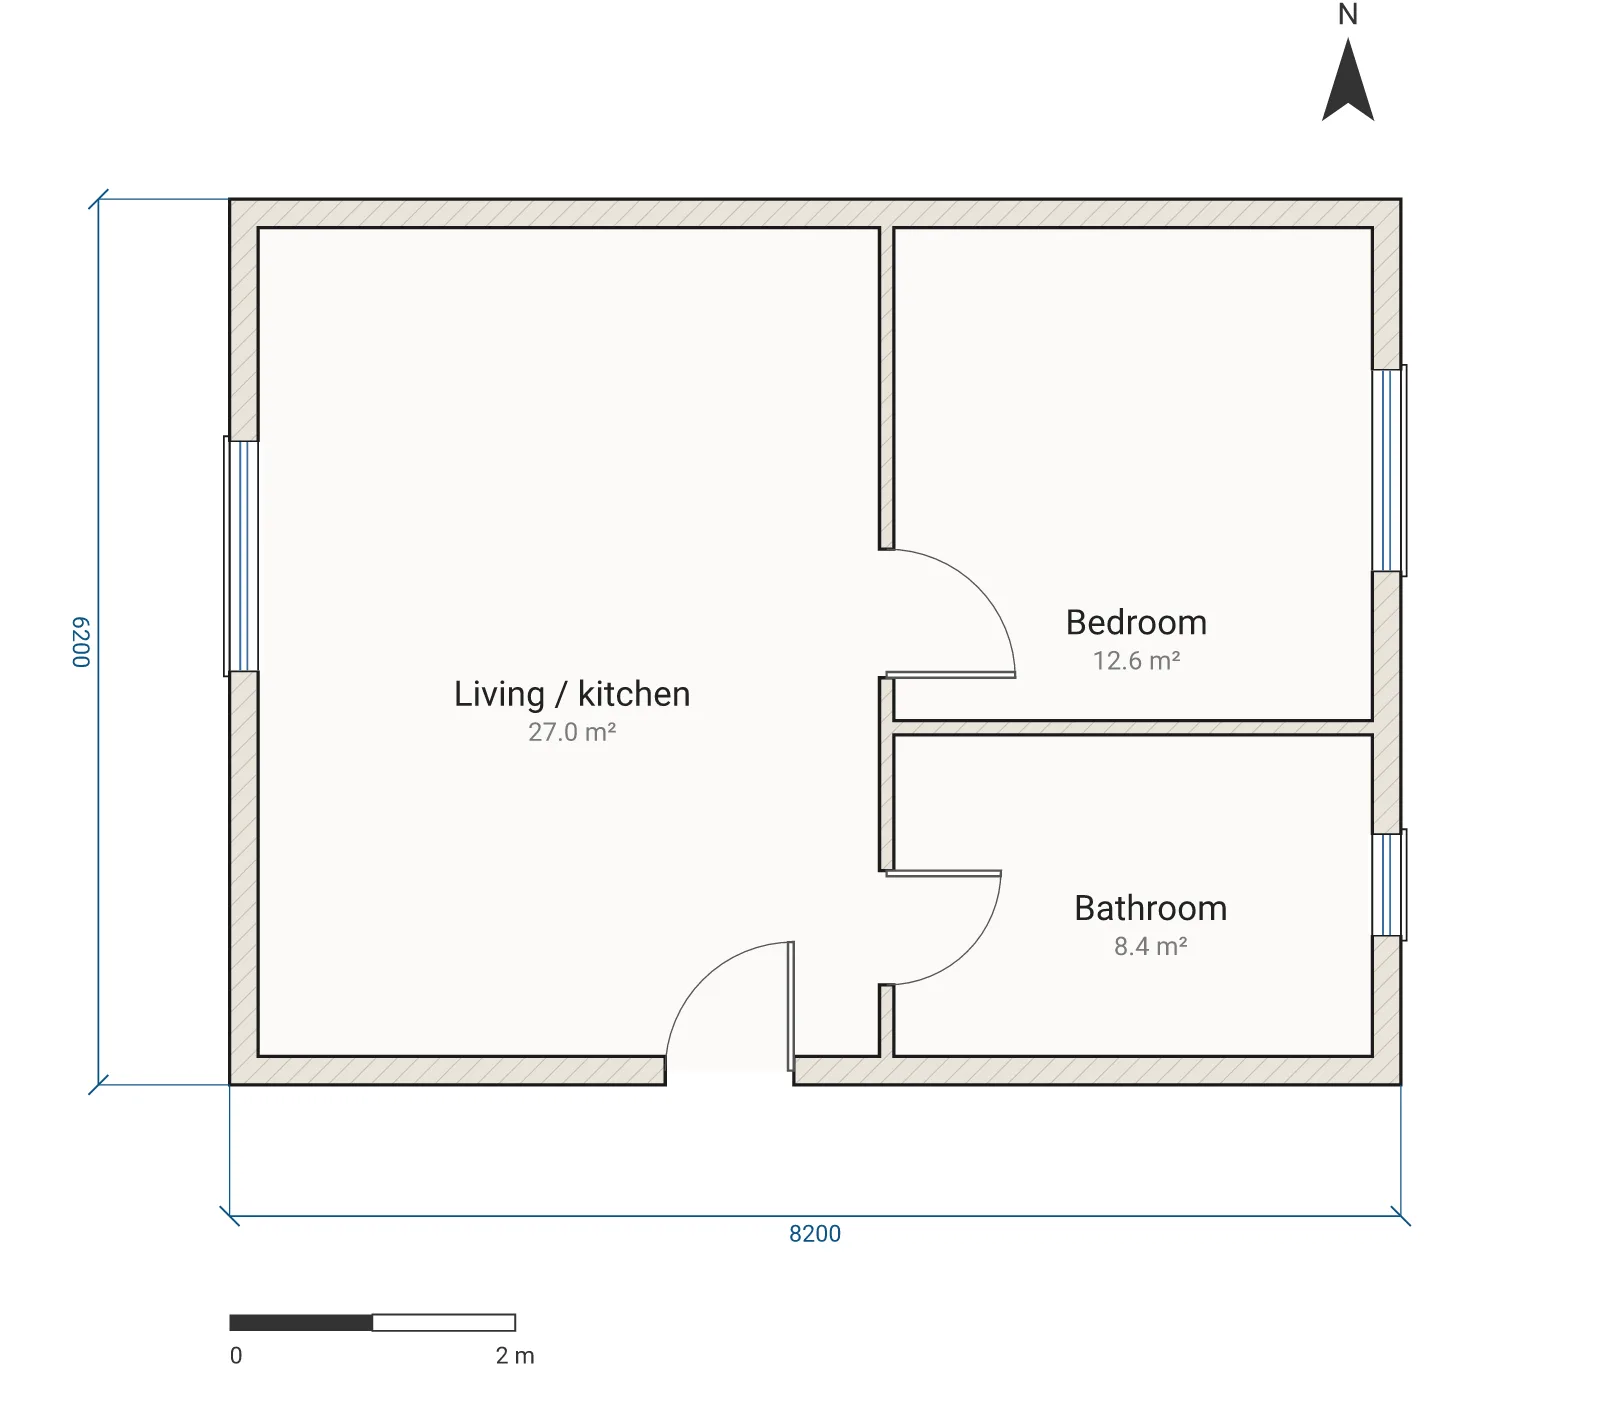
Reference drawing prepared for this guide. The furnished versions below show the same room arrangement and openings.
2. Upload the image and describe what must stay
Start a project from the floorplan.chat homepage and attach your reference image. Use a JPEG, PNG, or WebP image. If your source is a PDF, save the relevant floor plan page as a clear image first.
Pair the image with a brief that separates the existing layout from the changes you want:
Recreate this one-bedroom layout. The outside dimensions are 8.2 m wide by 6.2 m deep. Keep the entrance at the bottom, living and kitchen space on the left, and bedroom above bathroom on the right. Preserve the three windows and both interior door positions. Add a 1.5 m by 2 m bed, a 2.2 m sofa, and a kitchen along the bottom-left wall. Use a wall height of 2.7 m.
Image input is a reference-based reconstruction. Supply missing measurements and review the interpreted layout, especially when lines or labels are unclear. A floor plan image may leave window heights and ceiling heights unspecified, so include those in your brief when they matter.
3. Check the proposal, then check the 2D plan
floorplan.chat proposes a layout before drawing. Read that proposal and correct any misunderstanding before confirming it. Check the room count, room positions, and entrance first.
Once the drawing appears, compare it with the reference in a consistent order:
- Outside shape. Match each corner and the known width and depth.
- Partitions. Check that the bedroom and bathroom share the intended wall.
- Openings. Count the windows and doors, then check their wall positions and door swings.
- Connections. Follow a route from the entrance to every room.
- Furniture. Check the stated sizes and which wall each piece backs onto.
Here is the furnished version of the example. The entrance and bedroom doors are 900 mm wide. The bathroom door is 800 mm wide. The kitchen stays beside the entrance, while the seating area sits at the opposite end of the living space.
The bed's headboard touches the top wall, with access along both sides. The sofa faces into the living space. Its 1.2 m by 0.6 m coffee table sits in front, with a 0.4 m gap. These are the furniture sizes used in this example. Replace them with the sizes of pieces you actually own.
4. Open the corresponding 3D view
Use the 3D view beside the example to rotate the layout and look into each room. The 2D and 3D views show the same plan.
Check the doorway locations from inside the rooms. Look at the bed against its wall, the kitchen along the bottom wall, and the bathroom fixtures around the open center. Then return to 2D and check any distance that looks tight.
Ask specific questions while reviewing: Can you reach the wardrobe after opening the bedroom door? Is the kitchen route separate from the coffee table? Does each window appear in the same wall as the reference? Correct the underlying plan whenever you find a mismatch.
5. Make one change and compare both views again
A small first edit makes it easier to see whether the plan responds as intended. For this example, use:
Shorten the sofa from 2.2 m to 1.8 m. Keep its left end in place, center the coffee table in front of it, and keep the 0.4 m gap. Keep all walls, doors, windows, and other furniture in place.
The revised version below shows that change. The shorter sofa leaves more open floor to its right, and the table moves left to stay centered.
| Compare | First version | Revised version |
|---|---|---|
| Sofa length | 2.2 m | 1.8 m |
| Coffee table | Centered on the longer sofa | Centered on the shorter sofa |
| Gap in front of sofa | 0.4 m | 0.4 m |
| Room boundaries and openings | Reference arrangement | Same arrangement |
After an edit, check the requested change and the things you asked to keep. Use this same method for a larger bed, a relocated door, or a different kitchen arrangement.
Fix common 2D to 3D floor plan problems
A room is missing or in the wrong place. Compare the room list with the image. Name the missing room and its neighbors in your next message. For example: "Keep the bathroom below the bedroom, with its own door from the living area."
The shape looks right, but the size is wrong. Give a measured distance with both endpoints identified. Add another measurement across the other direction, then check the affected rooms again.
A window became a doorway. Identify the wall and opening in plain language. Ask to replace that opening, and specify its width if you know it.
Furniture blocks a route. Enter the actual furniture dimensions. Move or resize one piece, then check the nearby doors in 2D and the arrangement in 3D.
For drawing a layout from scratch, use our guide to drawing a floor plan online. To explore other room arrangements, browse the floor plan examples.
Questions about floor plan to 3D conversion
Can I use AI for a 2D to 3D floor plan?
Yes. In floorplan.chat, upload a reference image and describe the layout you want to recreate. Review the proposal, confirm it, then inspect and edit the resulting plan in 2D and 3D.
Can I start with a hand-drawn floor plan?
Yes. floorplan.chat accepts sketches as reference images. Make the walls and openings readable, label the rooms, and include known dimensions in your message.
Should I add furniture before checking the walls?
Check the outside shape, partitions, and openings first. Then add furniture with specific sizes. In this example, changing the sofa length is easy to compare because the room boundaries stay in place.
Can I keep editing after opening the 3D view?
Yes. You can revise the plan by chat or edit walls, doors, windows, furniture, and room names directly on the drawing. Return to both views after a change to inspect its effect.
“Recreate my one-bedroom floor plan from a reference image. Keep the existing room arrangement, doors, and windows. I will provide known dimensions. Add furniture and help me compare the layout in 2D and 3D.”
Start a project